
The DIY scrub revolution has taken over social media, with beauty influencers abandoning expensive store-bought exfoliators in favor of a simple homemade recipe that costs just $5 to make. This isn’t just any DIY scrub—it’s the formula that’s been secretly passed between top skincare enthusiasts for months, praised for delivering professional-quality results at a fraction of the cost. Today, I’m breaking the silence and revealing the exact recipe that has beauty creators raving. The best part? You probably already have most of the ingredients in your kitchen.
Why This DIY Scrub Has Beauty Influencers Talking
The beauty industry is flooded with exfoliating products that promise to transform your skin—many with price tags upwards of $50. Yet this simple DIY scrub has outperformed many luxury options in side-by-side comparisons. According to research published in the Journal of Cosmetic Dermatology, natural exfoliants can be just as effective as commercial products for removing dead skin cells and improving circulation.
What makes this particular DIY scrub stand out is its perfect balance of:
- Gentle yet effective exfoliation: Removes dead skin without microtears
- Skin-nourishing ingredients: Feeds your skin with nutrients rather than stripping it
- Customizability: Easily adapted for different skin types and concerns
- Sustainability: Minimal packaging waste compared to commercial products
- Cost-effectiveness: Delivers premium results at a fraction of the cost
As beauty influencer @GlowWithAva shared in a recent viral video: “I’ve tested hundreds of exfoliators and nothing—I mean NOTHING—has given me the immediate glow that this $5 DIY scrub delivers. I’ve officially cleared my shelf of expensive alternatives.”
The Secret $5 DIY Scrub Recipe Finally Revealed
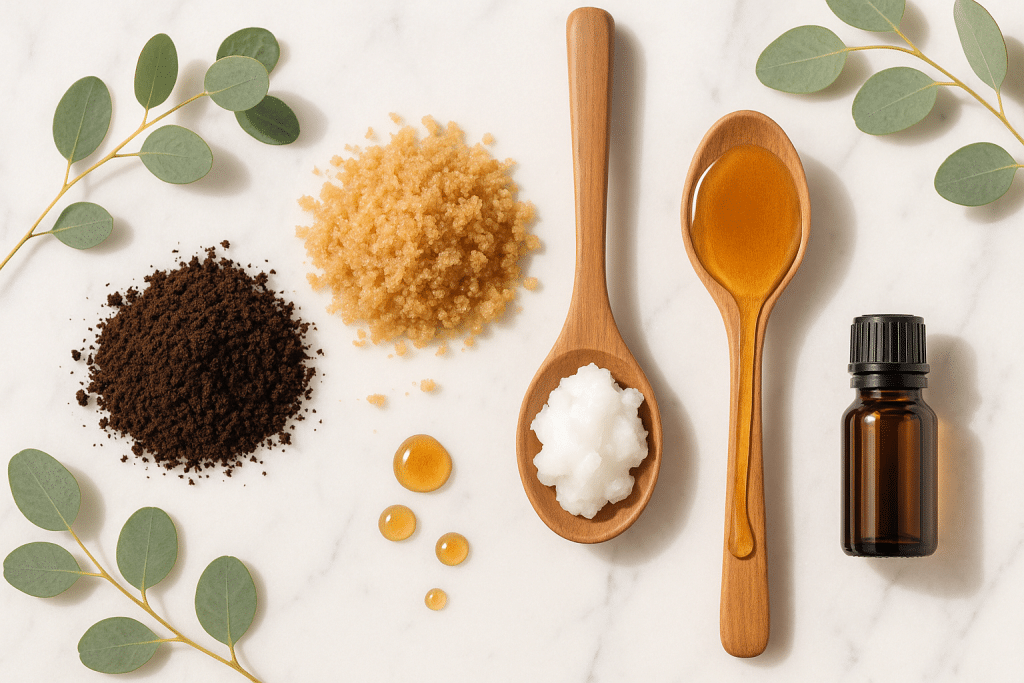
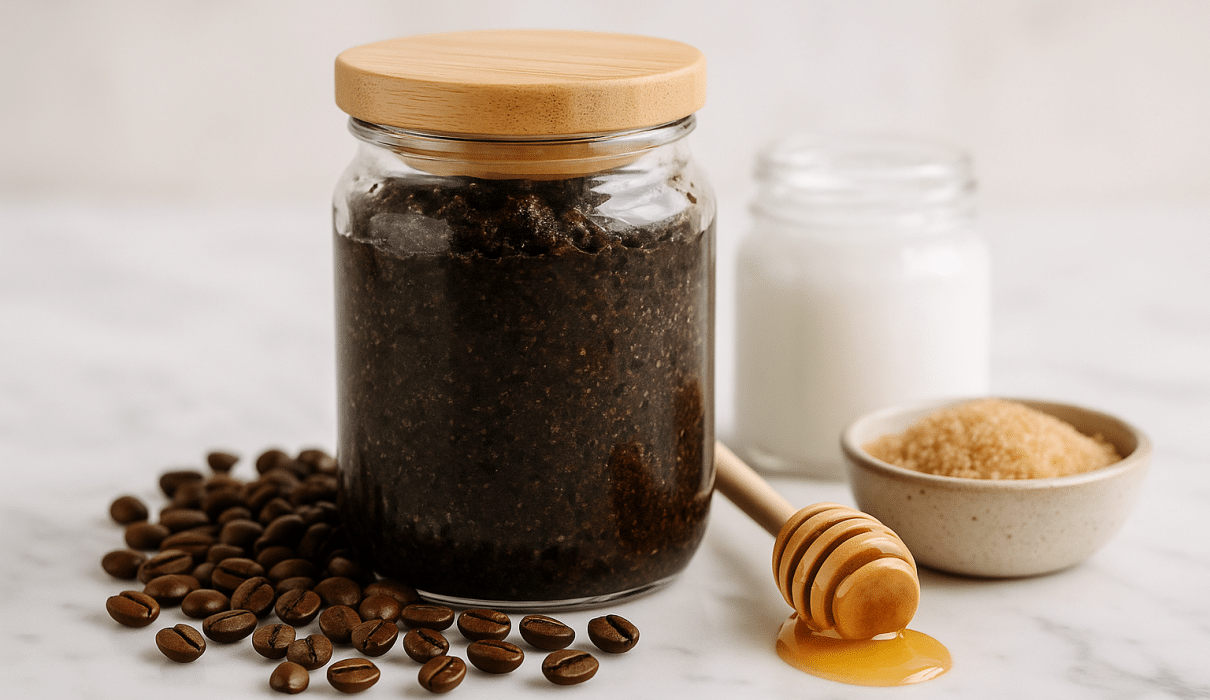
Basic Ingredients (Total cost: approximately $5)
- ½ cup coffee grounds (fresh or used but dried)
- ¼ cup brown sugar
- ¼ cup coconut oil (unrefined, virgin)
- 1 tablespoon honey
- 5-10 drops essential oil of choice (optional)
Equipment Needed
- Small mixing bowl
- Spoon for mixing
- Airtight glass jar for storage
The beauty of this DIY scrub is its affordability. If you’re a coffee drinker, you can simply save your used grounds (just make sure to dry them out first to prevent mold). The remaining ingredients are pantry staples that cost pennies per serving.
Check out our guide to sustainable beauty ingredients for more information on sourcing eco-friendly components for your DIY beauty products.
How To Make The Viral $5 DIY Scrub
Creating this DIY scrub couldn’t be simpler. Follow these straightforward steps:
- Prepare your coffee grounds: If using fresh, grind them to a medium-fine consistency. If using used grounds, ensure they’re completely dry by spreading them on a baking sheet for 24 hours.
- Mix dry ingredients: In a bowl, combine coffee grounds and brown sugar, breaking up any lumps.
- Melt coconut oil: If solid, gently warm the coconut oil until just melted (not hot). This can be done in the microwave (10-15 seconds) or in a small saucepan over low heat.
- Combine wet ingredients: Stir the honey into the melted coconut oil.
- Mix everything together: Pour the wet ingredients over the dry ingredients and mix thoroughly. The consistency should be like wet sand that holds together when pressed.
- Add fragrance (optional): Incorporate essential oils if desired. Popular choices include vanilla, lavender, or sweet orange.
- Transfer to container: Store your DIY scrub in an airtight glass container.
The process takes less than 10 minutes from start to finish, and you’ll have enough scrub to last for 8-10 applications.
Understanding Why Each Ingredient in This DIY Scrub Works
This isn’t just a random combination of kitchen ingredients—each component plays a specific role in making this DIY scrub so effective:
Coffee Grounds
The star ingredient in this DIY scrub, coffee grounds provide physical exfoliation while offering unique benefits. According to a study in the International Journal of Dermatology, caffeine in coffee may:
- Temporarily tighten skin through vasoconstriction
- Provide antioxidant protection
- Potentially improve circulation when applied topically
- Help reduce the appearance of cellulite
The specific texture of coffee grounds makes them ideal for exfoliation—firm enough to remove dead skin cells but not so harsh that they cause microtears in the skin.
Brown Sugar
A gentler exfoliant than salt or baking soda, brown sugar contains glycolic acid, an alpha hydroxy acid (AHA) that provides chemical exfoliation alongside the physical scrubbing. Brown sugar also dissolves more easily than white sugar, making it less likely to cause irritation.
Coconut Oil
Serves as the binding agent while delivering deep hydration. Coconut oil contains lauric acid, which has antimicrobial properties. It penetrates the skin better than many other oils, helping to:
- Lock in moisture after exfoliation
- Strengthen the skin barrier
- Soothe any irritation from the scrubbing action
For those concerned about coconut oil’s comedogenic properties, check out our article on alternatives to coconut oil for different skin types.
Honey
More than just a binding agent, honey is a natural humectant that draws moisture into the skin. Raw honey also offers:
- Antibacterial properties
- Antioxidant protection
- Soothing capabilities for sensitive or irritated skin
- Natural preservative qualities that extend the scrub’s shelf life
How to Use Your DIY Scrub for Best Results
To get the most out of your homemade creation, follow these application tips from skincare experts:
Face Application
- Cleanse first: Always start with clean skin to avoid pushing makeup and dirt deeper into pores.
- Apply gently: Take a small amount (about a teaspoon) and with damp fingers, gently massage in circular motions for 30-60 seconds, avoiding the eye area.
- Focus on problem areas: Spend a little extra time on areas prone to congestion, like the nose and chin.
- Rinse thoroughly: Use lukewarm (not hot) water to remove all scrub particles.
- Follow with moisture: Apply your favorite serum and moisturizer while skin is still slightly damp to lock in hydration.
Frequency recommendation: Use on the face 1-2 times per week. Over-exfoliation can damage your skin barrier.
Body Application
- Use on damp skin: Apply in the shower on wet skin for easier spreading.
- Scrub in circular motions: Focus on rough areas like elbows, knees, and heels.
- Let it sit: For extra hydration, leave the scrub on for 2-3 minutes before rinsing.
- Rinse well: Ensure all particles are washed away to prevent clogged drains.
Frequency recommendation: Safe to use on the body 2-3 times per week.
Customizing Your DIY Scrub for Different Skin Types
One reason beauty influencers are so obsessed with this DIY scrub is its versatility. Here’s how to adapt it for your specific skin needs:
For Sensitive Skin
- Reduce coffee grounds to ¼ cup and increase brown sugar to ½ cup (sugar is gentler)
- Add 1 tablespoon of colloidal oatmeal for extra soothing properties
- Consider substituting jojoba oil for coconut oil
- Add 3 drops of chamomile or lavender essential oil
For Oily/Acne-Prone Skin
- Increase coffee grounds to ⅔ cup for more exfoliation
- Reduce coconut oil to 3 tablespoons and add 1 tablespoon of castor oil
- Add 1 teaspoon of ground turmeric for its anti-inflammatory properties
- Consider 3-5 drops of tea tree or rosemary essential oil
For Dry/Mature Skin
- Keep the base recipe but add 1 tablespoon of avocado oil
- Include 1 teaspoon of vitamin E oil for additional antioxidant protection
- Consider adding 1 tablespoon of finely ground oats for gentler exfoliation
- Add 3-5 drops of frankincense or rose essential oil
For more targeted DIY skincare recipes for specific skin concerns, visit our custom skincare solution guide.
Why Beauty Influencers Chose This DIY Scrub Over Expensive Alternatives
The buzz around this $5 DIY scrub started when several major beauty influencers independently switched to it after years of promoting expensive commercial products. Here’s what some of them have shared:
“I was honestly shocked. After one use, my skin was smoother than it’s been with my $68 exfoliator that I’ve sworn by for years. The glow is undeniable, and I love knowing exactly what I’m putting on my skin.”
“My followers kept asking why my skin suddenly looked so much better in my no-makeup videos. This DIY scrub was the only change I made to my routine, and the results speak for themselves.”
These testimonials aren’t just anecdotal—many users report measurable improvements:
- Smoother texture within 1-2 applications
- Reduced appearance of blackheads after 2-3 weeks of consistent use
- More even skin tone within one month
- Better absorption of subsequent skincare products
- Longer-lasting hydration
Storage and Shelf Life of Your DIY Scrub
To keep your DIY scrub fresh and effective:
- Store in an airtight container, preferably glass
- Keep in a cool, dry place—not in the shower where water could introduce bacteria
- Use a clean, dry spoon to scoop out product (never wet fingers)
- Make small batches fresh every 2-3 weeks for maximum potency
While the honey and coconut oil have natural preservative properties, this DIY scrub doesn’t contain commercial preservatives, so its shelf life is shorter than store-bought products. Watch for any changes in smell, color, or texture that might indicate it’s time to make a fresh batch.
Common Mistakes to Avoid With Your DIY Scrub
Even with a simple recipe, there are pitfalls that can affect your results:
- Using hot coffee grounds: Always let grounds cool completely before mixing.
- Scrubbing too hard: Let the ingredients do the work—gentle pressure is all you need.
- Exfoliating irritated skin: Skip exfoliation if you have active breakouts, sunburn, or redness.
- Using on freshly shaved skin: Wait at least 24 hours after shaving to avoid irritation.
- Applying to broken skin: Never use scrubs on cuts, open wounds, or severely chapped skin.
FAQs About This Viral DIY Scrub
Is this DIY scrub suitable for all skin types?
The base recipe works well for normal to combination skin. Those with sensitive, very dry, or acne-prone skin should use the modified versions provided in the customization section. As with any new skincare product, perform a patch test first, especially if you have reactive skin.
Can I use used coffee grounds from my morning brew?
Absolutely! In fact, many beauty influencers prefer used grounds as they’re slightly softer and gentler on the skin. Just make sure to spread them out to dry completely before mixing into your scrub to prevent mold growth.
How does this compare to chemical exfoliants?
This DIY scrub primarily provides physical exfoliation (with some mild chemical exfoliation from the glycolic acid in brown sugar). It works differently from dedicated chemical exfoliants like AHAs and BHAs, which dissolve the bonds between dead skin cells. Many skincare enthusiasts use both in their routine—this scrub 1-2 times weekly and chemical exfoliants on alternate days.
Will the coffee grounds clog my drain?
Coffee grounds can potentially build up in pipes over time. To prevent plumbing issues, place a drain catcher in your shower or sink and dispose of captured grounds in the trash or compost.
Can I use this DIY scrub if I’m pregnant?
Most ingredients are pregnancy-safe, but always consult your healthcare provider. Some essential oils are not recommended during pregnancy, so you may want to omit them or research pregnancy-safe alternatives.
Try This DIY Scrub and Join the Natural Beauty Movement
This $5 DIY scrub represents more than just a trending beauty hack—it’s part of a larger movement toward natural, transparent skincare. By creating your own products, you gain complete control over what goes on your skin while reducing packaging waste and saving money.
If you try this viral DIY scrub, we’d love to see your results! Take before and after photos and share them with us on Instagram or TikTok using #EcoChicDIYScrub. We regularly feature community creations and success stories.
For more sustainable beauty recipes, ingredient deep-dives, and expert tips, visit EcoChicGlam.com.
What kitchen ingredients have you successfully incorporated into your beauty routine? Let us know in the comments below!
Disclaimer: While natural ingredients are generally well-tolerated, allergic reactions can occur. Always patch test new DIY skincare products before applying to large areas. This DIY scrub is not intended to treat or cure any skin conditions. If you have persistent skin concerns, please consult a dermatologist.