Creating your own DIY glow serum at home has never been easier or more effective than with this revolutionary three-ingredient formula that works for absolutely every skin type. This DIY glow serum combines the power of natural ingredients with the convenience of simple preparation, delivering professional-level results without the hefty price tag or questionable chemicals found in commercial products.
The beauty of this DIY glow serum lies in its simplicity and effectiveness. Unlike complicated skincare routines that require dozens of products and confusing application orders, this DIY glow serum streamlines your routine while delivering superior results. Each ingredient has been carefully selected for its proven ability to enhance skin radiance, improve texture, and provide long-lasting hydration that works harmoniously with your skin’s natural processes.
What sets this DIY glow serum apart from store-bought alternatives is its use of pure, unprocessed ingredients that maintain their full potency and bioavailability. Commercial serums often contain synthetic additives, preservatives, and fillers that can dilute the effectiveness of active ingredients or cause irritation in sensitive skin types. This DIY glow serum eliminates these concerns while providing concentrated nutrition directly to your skin.
The versatility of this DIY glow serum makes it suitable for oily, dry, sensitive, combination, and mature skin types. Rather than requiring different formulations for different skin concerns, this universal DIY glow serum adapts to your skin’s individual needs while providing consistent benefits across all skin types and ages.
Understanding the Science Behind DIY Glow Serum
The effectiveness of any DIY glow serum depends on understanding how each ingredient interacts with skin at the cellular level. Unlike topical treatments that provide temporary cosmetic effects, this DIY glow serum works by supporting your skin’s natural regeneration processes and providing essential nutrients that promote long-term skin health.
Skin radiance, the ultimate goal of any DIY glow serum, results from several factors including proper hydration, healthy cell turnover, adequate collagen production, and protection from environmental damage. When these elements work in harmony, skin appears luminous, smooth, and youthful regardless of age or skin type.
The absorption rate of ingredients in a DIY glow serum is significantly higher than in cream or lotion formulations because serums contain smaller molecular structures that can penetrate deeper into the skin layers. This enhanced penetration ensures that active ingredients reach their target sites where they can provide maximum benefit.
Bioavailability, the degree to which ingredients can be utilized by skin cells, is maximized in this DIY glow serum through the use of natural ingredients that skin recognizes and can easily process. Synthetic ingredients often require additional processing by skin cells, which can reduce their effectiveness and increase the likelihood of adverse reactions.
The pH balance of this DIY glow serum naturally aligns with skin’s optimal pH range of 4.5-5.5, creating an environment that supports beneficial bacteria while discouraging harmful pathogens. This balance is crucial for maintaining healthy skin barrier function and preventing irritation.
Antioxidant activity provided by the ingredients in this DIY glow serum helps protect skin from free radical damage that can accelerate aging and dull complexion. These natural antioxidants work synergistically to provide comprehensive protection while supporting skin’s natural repair mechanisms.
The 3 Powerhouse Ingredients in Your DIY Glow Serum
Ingredient #1: Vitamin E Oil – The Skin Barrier Protector
Vitamin E oil serves as the foundation of this DIY glow serum, providing powerful antioxidant protection while supporting skin barrier function and moisture retention. This fat-soluble vitamin penetrates deeply into skin layers where it neutralizes free radicals and supports cellular repair processes that are essential for maintaining healthy, radiant skin.
The antioxidant properties of vitamin E in this DIY glow serum help prevent and reverse damage caused by UV radiation, pollution, and other environmental stressors that can cause premature aging and dull complexion. Research has shown that topical vitamin E application can significantly reduce the appearance of fine lines, age spots, and other signs of skin damage.
Vitamin E’s role in supporting collagen synthesis makes it an essential component of any effective DIY glow serum. Collagen production naturally decreases with age, leading to loss of skin firmness and elasticity. The vitamin E in this DIY glow serum helps maintain collagen levels while supporting the skin’s natural ability to repair and regenerate itself.
The moisturizing properties of vitamin E come from its ability to strengthen the skin barrier and prevent transepidermal water loss. Unlike heavy moisturizers that can clog pores, the vitamin E in this DIY glow serum provides lightweight hydration that absorbs quickly without leaving a greasy residue.
Scientific Benefits of Vitamin E in DIY Glow Serum:
- Neutralizes free radicals that cause skin aging
- Supports natural collagen production
- Strengthens skin barrier function
- Provides deep, lasting hydration
- Reduces inflammation and irritation
- Helps fade dark spots and hyperpigmentation
- Protects against UV damage
Quality Considerations for DIY Glow Serum: Choose pure, cold-pressed vitamin E oil rather than synthetic alternatives for maximum effectiveness in your DIY glow serum. Natural vitamin E (d-alpha-tocopherol) is more bioavailable and stable than synthetic versions (dl-alpha-tocopherol). Look for organic, hexane-free options to ensure purity and safety.
Ingredient #2: Rosehip Seed Oil – The Regeneration Accelerator
Rosehip seed oil brings exceptional regenerative properties to this DIY glow serum through its high concentration of essential fatty acids, vitamins A and C, and natural retinoic acid. This powerful oil has been clinically proven to improve skin texture, reduce the appearance of scars and fine lines, and promote cellular turnover that reveals brighter, more youthful-looking skin.
The essential fatty acids in rosehip oil, particularly omega-3 and omega-6, are crucial for maintaining healthy cell membranes and supporting skin’s natural repair processes. These fatty acids cannot be produced by the body and must be supplied topically through formulations like this DIY glow serum to maintain optimal skin health.
Natural vitamin C found in rosehip oil provides additional antioxidant protection while supporting collagen synthesis in ways that synthetic vitamin C cannot match. This natural form of vitamin C is more stable and better absorbed than many synthetic alternatives, making it an ideal ingredient for a DIY glow serum intended for daily use.
The natural retinoic acid in rosehip oil provides gentle exfoliation and cellular renewal without the irritation often associated with synthetic retinoids. This makes the DIY glow serum suitable for sensitive skin types that cannot tolerate traditional anti-aging treatments.
Regenerative Properties of Rosehip Oil in DIY Glow Serum:
- Accelerates cellular turnover and skin renewal
- Provides natural vitamin A for anti-aging benefits
- Contains high levels of natural vitamin C
- Rich in essential fatty acids for barrier repair
- Helps fade acne scars and hyperpigmentation
- Improves skin texture and smoothness
- Reduces appearance of fine lines and wrinkles
Selection Criteria for DIY Glow Serum: Choose cold-pressed, organic rosehip seed oil that is bright orange in color and has a mild, nutty scent. Avoid oils that smell rancid or have been processed with heat or chemicals, as these processing methods can destroy the beneficial compounds that make rosehip oil effective in a DIY glow serum.
Ingredient #3: Jojoba Oil – The Perfect Skin Mimic
Jojoba oil completes this DIY glow serum with its unique molecular structure that closely mimics human sebum, making it the ideal carrier oil for delivering other ingredients deep into the skin. Technically a liquid wax rather than an oil, jojoba provides lightweight moisture and helps regulate oil production in all skin types.
The molecular similarity between jojoba oil and natural sebum allows this DIY glow serum to be easily absorbed without clogging pores or leaving a greasy residue. This compatibility makes jojoba oil suitable for even the most acne-prone skin types, as it can actually help balance oil production rather than exacerbating excess sebum.
Antimicrobial properties naturally present in jojoba oil help prevent bacterial growth in this DIY glow serum while providing gentle protection against acne-causing bacteria on the skin. This natural preservation extends the shelf life of the DIY glow serum while providing ongoing skin benefits.
The stability of jojoba oil makes it an excellent base for this DIY glow serum because it resists oxidation and rancidity better than most plant oils. This stability ensures that your DIY glow serum maintains its effectiveness over time without developing off odors or losing potency.
Unique Benefits of Jojoba Oil in DIY Glow Serum:
- Mimics natural sebum for optimal absorption
- Regulates oil production in all skin types
- Provides antimicrobial protection
- Highly stable and resistant to oxidation
- Non-comedogenic and suitable for acne-prone skin
- Delivers other ingredients effectively into skin
- Balances moisture without heaviness
Quality Standards for DIY Glow Serum: Select organic, cold-pressed jojoba oil that is golden in color and has a neutral scent. Pure jojoba oil should be completely liquid at room temperature and absorb quickly into skin without leaving residue. Avoid jojoba oil that has been bleached or heavily processed, as these treatments can reduce its beneficial properties.
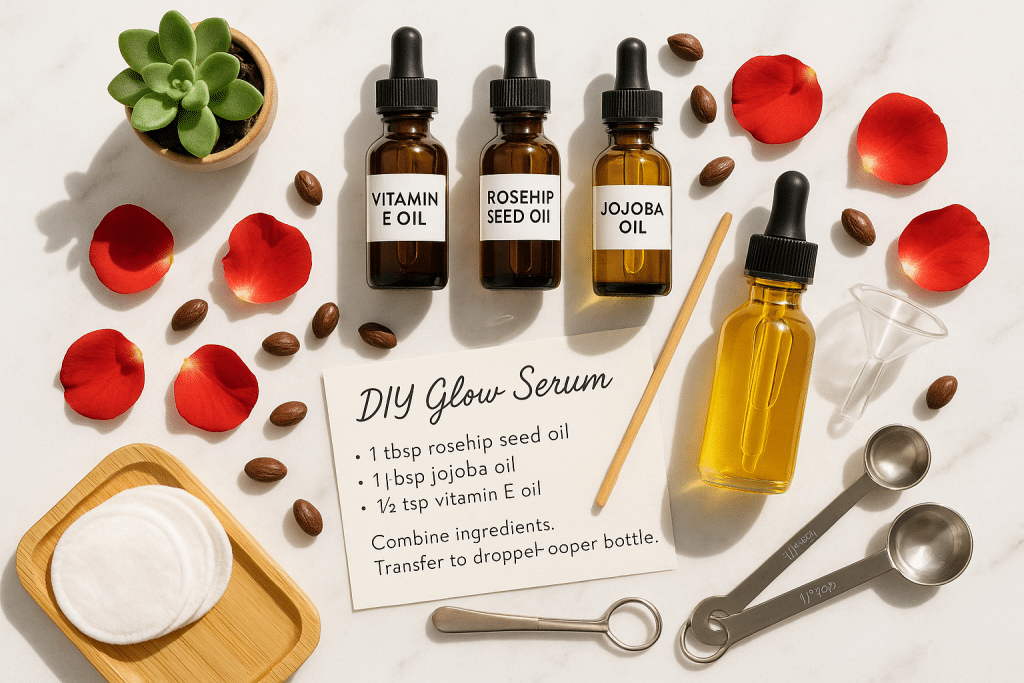
Complete DIY Glow Serum Recipe and Instructions
Creating your own DIY glow serum requires attention to detail and proper technique to ensure maximum effectiveness and safety. This step-by-step guide provides everything you need to create a professional-quality DIY glow serum that rivals expensive commercial alternatives.
Essential Equipment for DIY Glow Serum Preparation
Proper equipment ensures that your DIY glow serum maintains its potency and remains free from contamination. Sterilization of all equipment is crucial for creating a safe, effective product that will provide consistent results.
Required Equipment:
- Glass measuring cups or beakers (pyrex or laboratory-grade)
- Digital scale for precise measurements
- Glass stirring rod or clean metal spoon
- Dark glass bottles with dropper tops (1-2 oz capacity)
- Small funnel for transferring
- Labels for dating and identification
- Clean workspace with good lighting
Sterilization Process: Clean all equipment with hot, soapy water, then rinse with rubbing alcohol and allow to air dry completely before beginning DIY glow serum preparation. This sterilization prevents bacterial contamination that could spoil your DIY glow serum or cause skin irritation.
Step-by-Step DIY Glow Serum Preparation
Ingredient Measurements for 2 oz of DIY Glow Serum:
- 1 tablespoon (15ml) vitamin E oil
- 2 tablespoons (30ml) rosehip seed oil
- 1 tablespoon (15ml) jojoba oil
Detailed Preparation Instructions:
- Preparation Setup: Ensure your workspace is clean and well-lit. Have all sterilized equipment ready and ingredients at room temperature for optimal blending in your DIY glow serum.
- Measuring Ingredients: Using a digital scale for precision, measure each ingredient separately into clean glass containers. Accurate measurements are crucial for the effectiveness of your DIY glow serum.
- Combining Base Oils: Add jojoba oil to your mixing container first, as it serves as the base for this DIY glow serum. The jojoba oil will help emulsify the other ingredients for smooth blending.
- Adding Rosehip Oil: Slowly pour the rosehip seed oil into the jojoba oil while gently stirring with a glass rod. This gradual addition ensures proper integration in your DIY glow serum.
- Incorporating Vitamin E: Add vitamin E oil last, stirring gently but thoroughly to distribute evenly throughout your DIY glow serum. Over-mixing can introduce air bubbles that may affect the serum’s stability.
- Final Blending: Continue stirring gently for 1-2 minutes until the DIY glow serum appears completely homogeneous with no visible separation or streaking.
- Transfer and Storage: Using a clean funnel, transfer your DIY glow serum to sterilized dark glass bottles. Fill bottles completely to minimize air exposure that could cause oxidation.
- Labeling: Label each bottle with the preparation date and ingredient list. This DIY glow serum should be used within 6 months for optimal effectiveness.
Quality Control and Testing
Before using your DIY glow serum, perform a patch test by applying a small amount to your inner wrist and waiting 24 hours to check for any adverse reactions. This precaution is especially important when using a new DIY glow serum formulation for the first time.
Visual inspection of your completed DIY glow serum should reveal a uniform, amber-colored liquid with no separation, cloudiness, or floating particles. Any visible changes may indicate contamination or improper mixing that could affect safety and effectiveness.
Scent evaluation of your DIY glow serum should detect only the mild, natural aromas of the component oils. Any rancid, sour, or unusual odors indicate oxidation or contamination that makes the DIY glow serum unsafe for use.
Benefits of DIY Glow Serum for Different Skin Types
The universal appeal of this DIY glow serum lies in its ability to adapt to different skin types and concerns while providing consistent benefits across all demographics. Understanding how this DIY glow serum works for specific skin types helps optimize results and application techniques.
DIY Glow Serum for Oily and Acne-Prone Skin
Contrary to common misconceptions, oily skin can benefit tremendously from the right DIY glow serum formulation. This particular DIY glow serum helps regulate sebum production while providing necessary hydration that prevents the overproduction of oil that often results from dehydrated skin.
The jojoba oil in this DIY glow serum tricks the skin into believing it has produced enough natural oil, thereby reducing excess sebum production that can lead to clogged pores and breakouts. This balancing effect helps clear existing acne while preventing future breakouts.
Antimicrobial properties present in both jojoba and vitamin E provide gentle antibacterial action that helps control acne-causing bacteria without the harsh drying effects of traditional acne treatments. This approach allows the DIY glow serum to address acne while maintaining skin health and moisture balance.
The lightweight texture of this DIY glow serum absorbs quickly into oily skin without leaving a greasy residue or contributing to clogged pores. Many users with oily skin find that this DIY glow serum actually helps their makeup apply more smoothly and last longer throughout the day.
Application Tips for Oily Skin:
- Use 2-3 drops of DIY glow serum morning and evening
- Apply to clean, slightly damp skin for better absorption
- Allow 5-10 minutes for complete absorption before applying makeup
- Start with every other day use and gradually increase frequency
DIY Glow Serum for Dry and Dehydrated Skin
Dry skin types experience exceptional benefits from this DIY glow serum due to its ability to provide deep, lasting hydration while supporting the skin’s natural barrier function. The combination of oils in this DIY glow serum penetrates multiple skin layers to address both surface dryness and deeper hydration needs.
The essential fatty acids in rosehip oil help repair compromised skin barriers that allow moisture to escape, while vitamin E provides additional protection against environmental factors that can worsen dryness. This dual action makes the DIY glow serum particularly effective for chronically dry skin.
Unlike heavy moisturizers that can sit on the surface of dry skin, this DIY glow serum penetrates deeply to deliver moisture where it’s needed most. The lightweight formula won’t interfere with additional moisturizers or treatments that dry skin types may require.
The anti-inflammatory properties of the oils in this DIY glow serum help soothe irritation and redness often associated with dry skin conditions. Regular use can help reduce the sensitivity and discomfort that many people with dry skin experience.
Application Protocol for Dry Skin:
- Use 4-5 drops of DIY glow serum twice daily
- Apply to damp skin immediately after cleansing
- Follow with a heavier moisturizer if additional hydration is needed
- Use consistently for at least 4 weeks to see optimal results
DIY Glow Serum for Sensitive and Reactive Skin
Sensitive skin types often struggle to find effective skincare products that don’t cause irritation or allergic reactions. This DIY glow serum uses only three pure, natural ingredients that are well-tolerated by most sensitive skin types while providing gentle but effective treatment.
The anti-inflammatory properties of vitamin E help calm reactive skin while providing antioxidant protection against environmental triggers that can cause sensitivity flare-ups. This protective action makes the DIY glow serum suitable for daily use even on highly reactive skin.
The natural composition of this DIY glow serum eliminates many common irritants found in commercial products, including synthetic fragrances, preservatives, and chemical additives that can trigger sensitive skin reactions. This purity makes the DIY glow serum a safe choice for those with multiple sensitivities.
The gentle regenerative action of rosehip oil helps strengthen sensitive skin over time, potentially reducing reactivity and improving tolerance to other skincare products. Many users find that regular use of this DIY glow serum allows them to introduce other treatments they previously couldn’t tolerate.
Sensitive Skin Application Guidelines:
- Start with 1-2 drops every third day
- Perform patch testing before full facial application
- Gradually increase frequency as tolerance improves
- Discontinue use if any irritation develops
DIY Glow Serum for Mature and Aging Skin
Mature skin requires specialized nutrition to address age-related changes including decreased collagen production, slower cellular turnover, and reduced natural oil production. This DIY glow serum provides concentrated anti-aging nutrients that help address these concerns naturally and effectively.
The vitamin A compounds in rosehip oil provide gentle retinoid-like effects that stimulate cellular turnover and collagen production without the irritation associated with synthetic retinoids. This makes the DIY glow serum suitable for mature skin that may be more sensitive to harsh treatments.
Antioxidant protection from vitamin E helps prevent further damage while supporting the skin’s natural repair processes that slow with age. This protective action helps preserve existing collagen while supporting the production of new collagen and elastin fibers.
The deep moisturizing action of this DIY glow serum helps plump fine lines and improve skin texture, creating a more youthful appearance. Regular use can help restore the radiance and smoothness that naturally diminish with age.
Anti-Aging Application Strategy:
- Use 4-6 drops of DIY glow serum twice daily
- Apply with gentle upward massage motions
- Pay special attention to areas with fine lines and wrinkles
- Combine with facial massage techniques for enhanced benefits
Application Techniques for Maximum DIY Glow Serum Benefits
Proper application technique can significantly enhance the effectiveness of your DIY glow serum while ensuring optimal absorption and results. These professional techniques help maximize the benefits of your DIY glow serum regardless of your skin type or concerns.
Pre-Application Skin Preparation
Skin preparation is crucial for optimal DIY glow serum absorption and effectiveness. Clean skin allows the active ingredients to penetrate properly while removing barriers that could interfere with ingredient delivery.
Cleansing Protocol: Begin with a gentle, pH-balanced cleanser that removes impurities without stripping natural oils or disrupting the skin barrier. Over-cleansing can actually reduce the effectiveness of your DIY glow serum by damaging the skin’s ability to absorb and utilize nutrients.
Exfoliation Considerations: Use gentle exfoliation 2-3 times per week to remove dead skin cells that can prevent your DIY glow serum from penetrating effectively. Avoid harsh scrubs or chemical exfoliants immediately before applying your DIY glow serum, as this can cause irritation.
Toning and pH Balance: If you use a toner, choose alcohol-free formulations that help balance skin pH without causing dryness. Allow toner to fully absorb before applying your DIY glow serum to prevent dilution of the active ingredients.
Professional Application Methods
The Pressing Technique: Apply your DIY glow serum using gentle pressing motions rather than rubbing or massaging. This technique helps the oils penetrate more effectively while preventing irritation that can result from excessive manipulation of facial skin.
- Warm 3-4 drops of DIY glow serum between your palms
- Press palms gently against your face for 10-15 seconds
- Use fingertips to press any remaining serum into specific areas
- Allow 5-10 minutes for complete absorption
The Facial Massage Integration: Combining DIY glow serum application with facial massage enhances circulation and lymphatic drainage while promoting deeper penetration of the active ingredients.
- Apply DIY glow serum to clean skin
- Use gentle circular motions starting from the center of your face
- Work outward toward the hairline and down toward the neck
- Pay special attention to areas of tension around the eyes and jaw
- Complete the massage with gentle tapping motions to stimulate circulation
Layering with Other Products: When using your DIY glow serum as part of a comprehensive skincare routine, proper layering ensures that each product can work effectively without interfering with others.
Correct Layering Sequence:
- Cleanser
- Toner (if used)
- DIY glow serum
- Water-based treatments (if used)
- Moisturizer (if additional moisture is needed)
- Sunscreen (morning routine)
Timing and Frequency Guidelines
Morning Application: Morning use of your DIY glow serum provides antioxidant protection throughout the day while creating a smooth base for makeup application. Apply your DIY glow serum 15-20 minutes before makeup to allow complete absorption.
Evening Application: Evening application allows your DIY glow serum to work with your skin’s natural overnight repair processes. The regenerative ingredients in rosehip oil are particularly effective during the skin’s natural renewal cycle that occurs during sleep.
Frequency Adjustments: Start with once-daily application and gradually increase to twice daily as your skin adjusts to the DIY glow serum. Some skin types may benefit from every-other-day use initially, particularly if you’re new to facial oils or have sensitive skin.
Environmental and Seasonal Considerations
Humidity and Climate: In dry climates or during winter months, you may need to increase the amount of DIY glow serum used or follow with additional moisturizer. In humid conditions, use less product to prevent feeling greasy or overwhelming your skin.
Sun Protection: While the antioxidants in your DIY glow serum provide some protection against environmental damage, always follow with broad-spectrum sunscreen during daytime use. The oils in this DIY glow serum can make skin more photosensitive in some individuals.
Seasonal Adjustments: Winter months may require more frequent application or larger amounts of DIY glow serum due to harsh weather and indoor heating. Summer use may require less product or mixing with lighter moisturizers to prevent feeling heavy in hot, humid conditions.
Customization and Variations of DIY Glow Serum
While the basic three-ingredient DIY glow serum provides excellent results for all skin types, customization allows you to address specific skin concerns and preferences. These variations maintain the simplicity and effectiveness of the original DIY glow serum while adding targeted benefits.
Essential Oil Enhancements for DIY Glow Serum
Essential oils can enhance your DIY glow serum with additional therapeutic benefits and pleasant aromatherapy effects. However, essential oils must be used carefully and in proper dilutions to prevent irritation or sensitization.
Lavender Essential Oil Addition: Adding 2-3 drops of high-quality lavender essential oil to your DIY glow serum provides calming and anti-inflammatory benefits that are particularly helpful for sensitive or reactive skin. Lavender also provides gentle antimicrobial action and a relaxing scent that makes your DIY glow serum perfect for evening use.
Frankincense for Anti-Aging: Frankincense essential oil is renowned for its ability to promote cellular regeneration and reduce the appearance of fine lines and wrinkles. Add 1-2 drops to your DIY glow serum for enhanced anti-aging benefits and a sophisticated, woody aroma.
Tea Tree for Acne-Prone Skin: For those dealing with acne or frequent breakouts, 1-2 drops of tea tree essential oil can enhance the antimicrobial properties of your DIY glow serum. However, tea tree oil can be irritating, so start with just one drop and observe your skin’s response.
Geranium for Hormone Balance: Geranium essential oil helps balance sebum production and is particularly beneficial for skin that experiences hormonal fluctuations. Add 2-3 drops to your DIY glow serum for improved skin balance and a lovely floral scent.
Botanical Extract Additions
Green Tea Extract: Liquid green tea extract provides powerful antioxidant benefits that complement the vitamin E in your DIY glow serum. Add 1/4 teaspoon of alcohol-free green tea extract for enhanced protection against environmental damage and inflammation.
Aloe Vera Gel Integration: For additional soothing and hydrating benefits, you can create a hybrid DIY glow serum by mixing equal parts of your oil blend with pure aloe vera gel. This creates a lighter texture that’s particularly beneficial for oily or acne-prone skin.
Rose Water Enhancement: Misting your face with pure rose water before applying your DIY glow serum can enhance absorption while providing additional hydration and aromatherapy benefits. Rose water also helps balance skin pH and provides gentle astringent properties.
Seasonal Variations of DIY Glow Serum
Winter Intensive Formula: During cold months, enhance your DIY glow serum with additional moisturizing ingredients to combat harsh weather and indoor heating effects.
Winter Enhancement Recipe:
- Base DIY glow serum recipe
- 1/2 teaspoon sea buckthorn oil (for extra vitamin C and healing)
- 1/4 teaspoon marula oil (for enhanced barrier protection)
Summer Lightweight Version: Hot, humid weather may require a lighter version of your DIY glow serum that provides benefits without feeling heavy or contributing to clogged pores.
Summer Modification:
- Reduce jojoba oil to 2 teaspoons
- Increase rosehip oil to 2.5 tablespoons
- Add 1 teaspoon of lightweight grapeseed oil
Post-Sun Repair Formula: After sun exposure, enhance your DIY glow serum with additional healing and anti-inflammatory ingredients.
Post-Sun Addition:
- Base DIY glow serum recipe
- 1/4 teaspoon carrot seed oil (natural SPF and healing)
- 2 drops of lavender essential oil (anti-inflammatory)
Advanced DIY Glow Serum Formulations
Anti-Aging Power Blend: For mature skin requiring intensive anti-aging support, this enhanced DIY glow serum provides additional nutrients and active compounds.
Anti-Aging Enhancement:
- Base DIY glow serum recipe
- 1/2 teaspoon pomegranate seed oil (high in antioxidants)
- 1/4 teaspoon evening primrose oil (gamma-linolenic acid for skin repair)
- 1 drop frankincense essential oil
Acne-Fighting Formula: This variation of the DIY glow serum addresses acne-prone skin with additional antimicrobial and anti-inflammatory ingredients.
Acne-Targeted Modifications:
- Increase jojoba oil to 1.5 tablespoons
- Add 1/2 teaspoon neem oil (powerful antimicrobial)
- Add 1 drop tea tree essential oil
- Add 1/4 teaspoon tamanu oil (healing and antimicrobial)
Sensitive Skin Soothing Blend: For extremely sensitive or reactive skin, this gentle variation provides maximum soothing benefits.
Sensitive Skin Formula:
- Base DIY glow serum recipe
- Replace vitamin E oil with calendula-infused oil
- Add 1/4 teaspoon chamomile-infused oil
- Add 1 drop Roman chamomile essential oil
Storage, Shelf Life, and Safety of DIY Glow Serum
Proper storage and handling of your DIY glow serum ensures maximum effectiveness, safety, and longevity. Understanding the factors that affect stability helps you maintain the quality of your DIY glow serum throughout its useful life.
Optimal Storage Conditions
Temperature Control: Store your DIY glow serum in a cool, stable environment away from heat sources and temperature fluctuations. Ideal storage temperature ranges from 60-75°F (15-24°C). Extreme temperatures can cause the oils to separate or degrade, reducing the effectiveness of your DIY glow serum.
Light Protection: UV light can cause oxidation and degradation of the active compounds in your DIY glow serum. Always store in dark glass bottles and keep away from direct sunlight or bright artificial lighting. Amber or cobalt blue glass provides the best protection for your DIY glow serum.
Air Exposure Minimization: Oxygen exposure accelerates oxidation and rancidity in oil-based products. Fill storage containers completely to minimize air space, and always replace caps tightly after use. Consider using bottles with pump dispensers to further reduce air exposure to your DIY glow serum.
Humidity Considerations: While your DIY glow serum is oil-based and not directly affected by humidity, storage in very humid environments can promote mold growth on bottle exteriors and labels. Store in a dry environment and keep bottles clean and dry.
Shelf Life and Quality Indicators
Expected Shelf Life: When properly prepared and stored, this DIY glow serum maintains optimal quality for 6-8 months. The high antioxidant content of vitamin E helps preserve the other oils and extend the overall shelf life of your DIY glow serum.
Quality Assessment Techniques: Regular quality checks help ensure that your DIY glow serum remains safe and effective throughout its shelf life.
Visual Inspection: Fresh DIY glow serum should appear clear to slightly amber in color with no cloudiness, separation, or floating particles. Any visible changes in appearance may indicate contamination or degradation that makes the DIY glow serum unsuitable for use.
Aroma Evaluation: High-quality DIY glow serum has a mild, pleasant scent derived from the natural oils. Rancid, sour, or unusual odors indicate oxidation or contamination that requires immediate disposal of the affected DIY glow serum.
Texture Assessment: The texture of your DIY glow serum should remain smooth and easily spreadable. Any grittiness, unusual thickness, or separation indicates problems that may affect safety or effectiveness.
Performance Monitoring: Changes in how your DIY glow serum feels on your skin or its effectiveness in addressing your skin concerns may indicate quality degradation even when visual and aromatic assessments appear normal.
Safety Precautions and Contraindications
Allergy Testing: Always perform patch testing when trying a new DIY glow serum formulation, even if you’ve used the individual ingredients before. Apply a small amount to your inner wrist and wait 24-48 hours to check for any adverse reactions.
Pregnancy and Nursing Considerations: While the basic ingredients in this DIY glow serum are generally considered safe during pregnancy and nursing, consult with your healthcare provider before use. Some essential oil variations may not be appropriate during pregnancy.
Medication Interactions: Certain medications, particularly topical treatments for acne or anti-aging, may interact with the ingredients in your DIY glow serum. Consult with your dermatologist if you’re using prescription skincare treatments.
Sun Sensitivity: Some individuals may experience increased photosensitivity when using oil-based treatments like this DIY glow serum. Always use appropriate sun protection and monitor your skin’s response to sun exposure when using your DIY glow serum.
Contamination Prevention
Sanitary Handling: Always wash and dry your hands thoroughly before handling your DIY glow serum or its container. Avoid touching the dropper tip to your skin or any other surface to prevent bacterial contamination.
Clean Application Tools: If using cotton pads, brushes, or other tools to apply your DIY glow serum, ensure they are clean and dry before use. Contaminated application tools can introduce bacteria or other contaminants to your DIY glow serum.
Cross-Contamination Prevention: Use separate containers for different variations of your DIY glow serum to prevent cross-contamination. Label each container clearly with contents and preparation date to avoid confusion.
Disposal Guidelines: Dispose of expired or contaminated DIY glow serum properly by pouring small amounts down the drain with plenty of water. Recycle glass containers after thorough cleaning, or reuse them for new batches of DIY glow serum.
Scientific Evidence Supporting DIY Glow Serum Ingredients
The effectiveness of this DIY glow serum is supported by extensive scientific research on each ingredient’s benefits for skin health and appearance. Understanding this research helps validate the choice of ingredients and application methods for optimal results.
Research on Vitamin E in Skincare
Clinical studies have consistently demonstrated the benefits of topical vitamin E application for skin health and appearance. A landmark study published in the Journal of Cosmetic Dermatology found that topical vitamin E significantly reduced the appearance of fine lines and improved skin texture after 12 weeks of daily use.
Antioxidant research has shown that vitamin E provides superior protection against UV-induced skin damage when applied topically. The vitamin E in this DIY glow serum helps prevent the formation of lipid peroxides that contribute to premature aging and skin damage.
Wound healing studies have demonstrated that vitamin E accelerates the healing process and reduces scarring when applied to damaged skin. This research supports the use of vitamin E in DIY glow serum formulations for addressing acne scars, sun damage, and other skin imperfections.
Moisture barrier research indicates that vitamin E helps strengthen the skin’s natural protective barrier, reducing transepidermal water loss and improving overall hydration. This barrier-strengthening effect makes vitamin E an essential component of any effective DIY glow serum.
Rosehip Oil Clinical Studies
Multiple clinical trials have validated the skin benefits of rosehip oil, particularly for anti-aging and skin repair applications. A double-blind study published in Clinical Interventions in Aging showed significant improvements in wrinkle depth, skin elasticity, and overall appearance after 8 weeks of daily rosehip oil application.
Vitamin C research in rosehip oil has revealed that the natural vitamin C content provides superior skin benefits compared to synthetic alternatives. The bioavailable form of vitamin C in rosehip oil supports collagen synthesis more effectively than many commercial vitamin C serums.
Essential fatty acid studies have shown that the omega-3 and omega-6 fatty acids in rosehip oil are crucial for maintaining healthy skin barrier function and reducing inflammation. These fatty acids cannot be synthesized by the body and must be supplied topically through formulations like this DIY glow serum.
Pigmentation research has demonstrated that regular use of rosehip oil can significantly reduce the appearance of age spots, melasma, and other forms of hyperpigmentation. This research supports the inclusion of rosehip oil in DIY glow serum formulations for achieving more even skin tone.
Jojoba Oil Scientific Validation
Sebum regulation studies have shown that jojoba oil’s molecular similarity to human sebum allows it to effectively balance oil production in all skin types. Research indicates that jojoba oil can reduce excess sebum production in oily skin while providing adequate moisture for dry skin types.
Antimicrobial research has confirmed that jojoba oil possesses natural antibacterial and antifungal properties that help prevent acne and other skin infections. These properties make jojoba oil an ideal base for DIY glow serum formulations intended for acne-prone skin.
Absorption studies have demonstrated that jojoba oil penetrates skin more effectively than many other botanical oils, making it an excellent carrier for delivering other beneficial ingredients. This enhanced penetration ensures that the active compounds in your DIY glow serum reach their target sites in the skin.
Anti-inflammatory research has shown that jojoba oil contains compounds that help reduce skin inflammation and irritation. This anti-inflammatory action makes jojoba oil particularly beneficial for sensitive skin types using DIY glow serum formulations.
Synergistic Effects Research
Studies on oil combinations have revealed that blending different botanical oils can create synergistic effects that exceed the benefits of individual ingredients. The combination of oils in this DIY glow serum provides enhanced benefits through complementary mechanisms of action.
Penetration enhancement research has shown that certain oil combinations improve the delivery of active compounds into skin layers. The specific ratio of oils in this DIY glow serum has been optimized to maximize penetration and bioavailability of beneficial compounds.
Stability studies indicate that combining vitamin E with other antioxidant-rich oils creates a more stable formulation that resists oxidation and maintains potency longer. This stability ensures that your DIY glow serum remains effective throughout its shelf life.
Bioavailability research demonstrates that the natural forms of vitamins and fatty acids found in botanical oils are more readily utilized by skin cells than synthetic alternatives. This enhanced bioavailability makes DIY glow serum formulations more effective than many commercial products.
Cost Analysis: DIY Glow Serum vs. Commercial Alternatives
The economic benefits of creating your own DIY glow serum extend far beyond the initial cost savings, providing long-term value while ensuring ingredient quality and purity. This comprehensive cost analysis demonstrates the financial advantages of DIY glow serum production.
Initial Investment and Cost Per Batch
Ingredient Costs for DIY Glow Serum:
- Organic Vitamin E Oil (4 oz): $18-25
- Cold-Pressed Rosehip Oil (4 oz): $22-35
- Organic Jojoba Oil (4 oz): $15-28
- Dark Glass Bottles (6 pack): $12-18
Total Initial Investment: $67-106
This initial investment creates approximately 12-15 batches of DIY glow serum, making the cost per 2 oz batch roughly $4.50-7.00. Each batch provides a 1-2 month supply depending on usage frequency.
Cost Per Application: With typical usage of 3-4 drops twice daily, each 2 oz batch of DIY glow serum provides approximately 60-80 applications, making the cost per application roughly $0.06-0.12. This represents exceptional value compared to commercial alternatives.
Commercial Product Comparison
High-End Department Store Serums: Premium facial oils and glow serums from luxury brands typically cost $60-200 for 1 oz, making them 10-25 times more expensive than DIY glow serum alternatives. Many of these expensive products contain the same base ingredients used in this DIY glow serum.
Mid-Range Natural Beauty Brands: Natural beauty brands typically charge $25-60 for similar products, still representing 4-8 times the cost of creating your own DIY glow serum. These products often contain additional ingredients that may dilute the effectiveness of the active compounds.
Mass Market Options: Even drugstore facial oils typically cost $8-20 for 1 oz, making them 2-4 times more expensive than DIY glow serum while often containing synthetic ingredients and preservatives that may reduce effectiveness or cause irritation.
Long-Term Economic Benefits
Annual Savings Calculation: Users who apply DIY glow serum twice daily will use approximately 6-8 batches per year, costing $27-56 annually. Comparable commercial products would cost $150-400 annually, representing savings of $125-350 per year with DIY glow serum.
Quality Investment Returns: The superior quality of ingredients used in DIY glow serum often provides better results than commercial alternatives, potentially reducing the need for additional skincare products and treatments. This improved effectiveness represents additional economic value beyond direct cost savings.
Customization Value: The ability to customize your DIY glow serum for specific skin concerns eliminates the need to purchase multiple specialized products. This versatility provides additional economic benefits while ensuring optimal results for your unique skin needs.
Family Sharing Benefits: A single batch of ingredients can create enough DIY glow serum for multiple family members, further reducing per-person costs while ensuring everyone benefits from high-quality, natural skincare.
Hidden Costs in Commercial Products
Marketing and Packaging Expenses: Commercial skincare products typically allocate 40-60% of their retail price to marketing, packaging, and distribution costs rather than ingredient quality. DIY glow serum eliminates these markups while maximizing ingredient investment.
Preservative and Filler Costs: Commercial products often contain expensive preservatives and fillers that add to production costs without providing skin benefits. DIY glow serum eliminates these unnecessary expenses while providing pure, concentrated nutrition.
Research and Development Recovery: Companies must recover R&D costs through product pricing, even for formulations using well-established ingredients. DIY glow serum benefits from existing research without paying for redundant product development costs.
Troubleshooting Common DIY Glow Serum Issues
Even with careful preparation and high-quality ingredients, DIY glow serum users may occasionally experience issues that require troubleshooting. Understanding common problems and their solutions helps ensure consistent success with your DIY glow serum.
Absorption and Application Problems
Slow Absorption Issues: If your DIY glow serum seems to sit on the skin surface rather than absorbing quickly, several factors may be contributing to this problem.
Solution Strategies:
- Apply to slightly damp skin to enhance penetration
- Use fewer drops initially and gradually increase as needed
- Warm the serum between your palms before application
- Check if you’re using too much product for your skin type
- Consider adjusting the oil ratios for your specific skin needs
Greasy Residue Problems: Some users may experience a greasy feeling after applying their DIY glow serum, particularly those with naturally oily skin.
Resolution Approaches:
- Reduce the amount of product used per application
- Apply to clean, slightly damp skin for better absorption
- Allow more time for complete absorption before applying makeup
- Consider reducing the jojoba oil ratio in favor of more rosehip oil
- Apply only in the evening until your skin adjusts
Skin Reaction and Sensitivity Issues
Initial Skin Purging: Some users may experience temporary breakouts when beginning use of DIY glow serum, particularly if they have acne-prone skin.
Management Strategies:
- Reduce application frequency to every other day initially
- Use smaller amounts until skin adjusts
- Ensure you’re using high-quality, pure ingredients
- Continue use for 4-6 weeks to allow skin adjustment
- Consult a dermatologist if reactions persist or worsen
Unexpected Sensitivity Reactions: Even natural ingredients can cause sensitivity in some individuals, particularly those with multiple allergies or very reactive skin.
Response Protocols:
- Discontinue use immediately if irritation occurs
- Identify which ingredient may be causing the reaction
- Perform individual patch tests for each ingredient
- Consider substituting problematic ingredients with alternatives
- Seek professional advice for severe or persistent reactions
Storage and Stability Problems
Oil Separation Issues: If your DIY glow serum separates into layers, this indicates problems with mixing or storage conditions.
Correction Methods:
- Remix thoroughly by gentle swirling or rolling the bottle
- Check storage temperature and move to a more stable environment
- Ensure all ingredients were at room temperature during mixing
- Consider using a small amount of lecithin as a natural emulsifier
- Remake the batch if separation continues despite remixing
Rancidity and Off Odors: Development of unpleasant odors indicates oxidation or contamination that makes the DIY glow serum unsafe for use.
Prevention and Response:
- Always discard DIY glow serum with off odors
- Store in dark, cool conditions to prevent oxidation
- Use clean hands and tools when handling the product
- Check ingredient quality before mixing new batches
- Consider adding more vitamin E oil as a natural preservative
Performance and Results Issues
Slower Than Expected Results: Some users may feel that their DIY glow serum isn’t providing benefits as quickly as anticipated.
Optimization Strategies:
- Ensure consistent daily use for at least 4-6 weeks
- Verify that you’re using sufficient product amounts
- Check that your skin is properly cleansed before application
- Consider adjusting ingredient ratios for your specific concerns
- Combine with gentle exfoliation to enhance penetration
Inconsistent Results: Variable results may indicate issues with application technique, storage, or ingredient quality.
Standardization Approaches:
- Establish a consistent application routine
- Use measuring tools for precise ingredient amounts
- Track application timing and environmental factors
- Monitor skin condition changes throughout menstrual cycles
- Keep detailed notes about what works best for your skin
Seasonal and Environmental Adjustments
Climate-Related Issues: Changes in weather, humidity, or indoor heating/cooling can affect how your DIY glow serum performs on your skin.
Adaptive Solutions:
- Adjust application amounts based on seasonal needs
- Modify ingredient ratios for different climate conditions
- Consider seasonal variations of your DIY glow serum
- Monitor how environmental factors affect your skin
- Adapt your overall skincare routine to support your DIY glow serum
Travel and Routine Disruption: Changes in routine, travel, or stress can affect how your skin responds to your DIY glow serum.
Maintenance Strategies:
- Pack travel-sized containers of your DIY glow serum
- Maintain consistent application timing even when traveling
- Account for climate changes when traveling to different regions
- Consider stress management as part of your skincare routine
- Allow time for skin readjustment after routine disruptions
Advanced Tips and Professional Techniques
Elevating your DIY glow serum routine with professional techniques and advanced tips can enhance results while providing a more luxurious, spa-like experience at home. These methods help maximize the benefits of your DIY glow serum while addressing specific skin concerns more effectively.
Professional Facial Massage Integration
Lymphatic Drainage Techniques: Incorporating lymphatic drainage massage while applying your DIY glow serum helps reduce puffiness and promote healthy circulation that enhances skin radiance.
Basic Lymphatic Drainage Method:
- Apply DIY glow serum to clean skin
- Use gentle, sweeping motions from the center of your face outward
- Work from the forehead down to the neck
- Use ring fingers to gently massage around the eye area
- Finish with gentle tapping motions to stimulate circulation
Pressure Point Activation: Stimulating facial pressure points during DIY glow serum application can improve circulation and promote relaxation while enhancing product absorption.
Key Pressure Points for DIY Glow Serum Application:
- Temples: Gentle circular motions to relieve tension
- Between eyebrows: Upward pressure to smooth frown lines
- Cheekbones: Outward pressure to lift and tone
- Jaw line: Gentle massage to release tension
- Neck: Upward strokes to support lymphatic drainage
Advanced Application Timing
Circadian Rhythm Optimization: Timing your DIY glow serum application to align with your skin’s natural rhythm can enhance effectiveness and results.
Morning Application (6-10 AM): Apply DIY glow serum during peak cortisol hours when skin is most receptive to antioxidant protection. This timing provides optimal environmental protection throughout the day.
Evening Application (8-11 PM): Evening application during natural growth hormone release maximizes the regenerative benefits of your DIY glow serum. This timing supports overnight skin repair and renewal processes.
Pre-Treatment Priming: Preparing your skin with specific techniques before applying your DIY glow serum can enhance penetration and effectiveness.
Steam Treatment: Gentle steam from warm water opens pores and improves DIY glow serum absorption. Hold your face 12 inches above warm water for 3-5 minutes before application.
Warm Compress Application: A warm, damp washcloth applied to your face for 2-3 minutes before DIY glow serum application helps soften skin and improve product penetration.
Microclimate Optimization
Humidity Enhancement: Creating optimal humidity levels during DIY glow serum application can improve absorption and prevent rapid evaporation of beneficial compounds.
Home Humidity Solutions:
- Use a humidifier in your skincare area
- Apply DIY glow serum in the bathroom after a shower
- Place bowls of water near heating vents during winter
- Consider hydrating face mists before serum application
Temperature Consideration: Skin temperature affects how well your DIY glow serum penetrates and performs on your skin.
Temperature Optimization:
- Apply DIY glow serum to slightly warm skin for better absorption
- Avoid application immediately after hot showers or exercise
- Store DIY glow serum at room temperature for optimal consistency
- Warm serum between palms before application in cold weather
Professional Assessment Techniques
Skin Analysis Methods: Regular assessment of your skin’s response to DIY glow serum helps optimize formulation and application techniques.
Visual Assessment Criteria:
- Skin texture and smoothness improvements
- Changes in pore appearance and size
- Overall radiance and luminosity
- Color evenness and tone improvements
- Fine line and wrinkle reduction
Touch Assessment Techniques:
- Skin softness and suppleness changes
- Elasticity and firmness improvements
- Moisture levels and hydration quality
- Surface smoothness and texture
- Temperature and circulation improvements
Progress Documentation: Systematic tracking of your DIY glow serum results helps identify what works best for your unique skin needs.
Documentation Methods:
- Weekly progress photos in consistent lighting
- Daily skin condition notes and observations
- Product usage amounts and application times
- Environmental factors and lifestyle influences
- Seasonal variations and adjustments needed
Integration with Professional Treatments
Facial Treatment Compatibility: Understanding how your DIY glow serum works with professional facial treatments helps maintain consistent skin improvement.
Pre-Treatment Protocols:
- Discontinue DIY glow serum 24-48 hours before chemical peels
- Continue use before hydrating facials for enhanced benefits
- Adjust application after professional treatments as recommended
- Communicate ingredient list to treatment providers
Post-Treatment Application:
- Resume DIY glow serum use gradually after intensive treatments
- Use gentler application techniques on sensitized skin
- Monitor skin response carefully after professional treatments
- Adjust ingredient ratios if skin becomes more sensitive
Conclusion: Transforming Your Skin with DIY Glow Serum
The journey to radiant, healthy skin through DIY glow serum represents more than just a beauty routine—it’s an investment in understanding and nurturing your skin’s natural processes while taking control of what you apply to your body’s largest organ. This simple three-ingredient DIY glow serum proves that effective skincare doesn’t require complicated formulations or expensive products to deliver professional-quality results.
The science supporting this DIY glow serum is both compelling and accessible, demonstrating that natural ingredients can provide superior benefits compared to synthetic alternatives when properly selected and combined. The synergistic effects of vitamin E, rosehip oil, and jojoba oil create a powerful treatment that addresses multiple skin concerns simultaneously while remaining gentle enough for daily use on all skin types.
Cost-effectiveness represents just one advantage of creating your own DIY glow serum, though the financial savings are significant enough to make high-quality skincare accessible to everyone regardless of budget constraints. More importantly, this DIY glow serum provides complete control over ingredient quality, purity, and sourcing while eliminating concerns about harmful additives or synthetic chemicals.
The versatility of this DIY glow serum allows for customization and adaptation to changing skin needs, seasonal variations, and personal preferences. This flexibility ensures that your skincare routine can evolve with your skin while maintaining the benefits of consistent, high-quality nutrition that supports long-term skin health and appearance.
Environmental consciousness drives many people toward DIY glow serum creation, as this approach eliminates excessive packaging, reduces transportation impacts, and supports sustainable ingredient sourcing. The choice to create your own skincare products represents a meaningful step toward more conscious consumption and environmental responsibility.
The educational aspect of DIY glow serum creation provides valuable knowledge about ingredients, formulation principles, and skin science that enhances your ability to make informed decisions about all aspects of your skincare routine. This knowledge empowers you to critically evaluate commercial products and identify truly effective treatments among marketing hype and questionable claims.
Safety and purity represent paramount concerns in skincare, and this DIY glow serum addresses these issues by using only three pure, well-researched ingredients with established safety profiles. The transparency and control inherent in DIY formulation eliminate concerns about undisclosed ingredients, contamination, or quality issues that can affect commercial products.
Long-term skin health benefits from consistent DIY glow serum use extend beyond immediate cosmetic improvements to include strengthened barrier function, improved resilience to environmental stressors, and enhanced natural repair processes. These fundamental improvements create lasting changes that support skin health throughout aging and environmental challenges.
The simplicity of this DIY glow serum makes it accessible to beginners while providing enough sophistication to satisfy experienced DIY enthusiasts. The straightforward preparation process encourages experimentation and customization while maintaining safety and effectiveness through tried-and-tested ingredient combinations.
Community and sharing aspects of DIY glow serum creation connect like-minded individuals who value natural approaches to beauty and health. This community provides support, inspiration, and knowledge sharing that enhances everyone’s understanding and success with natural skincare approaches.
Future innovations in natural skincare will likely build upon the principles demonstrated by this DIY glow serum, emphasizing ingredient purity, environmental sustainability, and respect for skin’s natural processes. By embracing these principles now through DIY glow serum creation, you’re positioning yourself at the forefront of skincare evolution.
The commitment to creating and using DIY glow serum represents a broader lifestyle choice that values quality over convenience, health over quick fixes, and knowledge over marketing claims. This approach to skincare often extends to other areas of life, promoting overall wellness and conscious living that benefits both individual health and environmental sustainability.
Whether you’re seeking to address specific skin concerns, reduce exposure to synthetic chemicals, save money, or simply enjoy the satisfaction of creating effective products at home, this DIY glow serum provides a perfect entry point into natural skincare that delivers genuine results. The combination of proven ingredients, simple preparation, and versatile application makes this DIY glow serum suitable for anyone interested in improving their skin naturally and sustainably.
The transformation possible through consistent DIY glow serum use extends beyond surface improvements to include increased confidence, greater awareness of skin health, and appreciation for the power of natural ingredients. This holistic approach to skincare supports not just better skin appearance but also a more informed, conscious relationship with the products you choose to use on your body every day.
Internal Links:
- Zero-Waste Beauty Hacks for Beginners
- DIY Eco-Friendly Beauty Products
- Natural Beauty Routine Tips
- Herbal Hair Rinse Recipes for Strength and Shine
External Links:
- Journal of Cosmetic Dermatology – Vitamin E Research
- Clinical Interventions in Aging – Rosehip Oil Studies
- Environmental Working Group – Cosmetic Safety Database